
Dpi, ppi, pixels, points, resolution - all these technical terms seem to confuse a lot of artists out there, so we decided to make a blog article on that topic, hoping to shed some light by breaking things down in a simple way.

For those of you who don't want to read the entire article, here's a rule of thumb:
You need 72dpi if you just want to post the artwork on social media. 300 dpi is what you need if you want to print your artwork later on. The dpi settings don't make your artwork appear more detailed, only the number of pixels is responsible for that. Use at least a 5000px canvas to paint a realistic portrait.
__________
What is ppi?
Each display is made up of millions of tiny pixels that present a sharp image when viewed from a distance. Ppi stands for “pixels per inch” on a screen. So if you draw a rectangle on your screen, it will contain a certain amount of pixels. But depending on the brand and the device, the screens can have very different ppi values. The iPad Pro for instance shows 264 ppi, so a square with the size of 1 inch on the iPad pro contains 264 pixels. That’s a lot of pixels! And because of that, it looks very sharp in our eyes. The pixels are very small and dense, thus you can’t see the single pixels.
Imagine you could enlarge that iPad by a factor of 10 or 50. Now you would definitely spot the individual pixels, and the display would no longer look so sharp up close. If you look at a normal 27-inch monitor with Full HD resolution (1920 x 1080 pixels), you would also see the individual pixels there. Because such a monitor can only display 82 pixels per inch. This looks less sharp than a 4k monitor (163 ppi) or the iPad Pro (264 ppi).
So when you look at an image that has a resolution of 2000 x 2000 pixels on a 27 inch 4k screen, it will cover only a part of the screen. But when you look at the exact same image on a 27 inch Full HD screen, it will be displayed even bigger than the screen and you can’t see the whole image!
What is dpi?
Dpi stands for “Dots per inch” and is related to the printing process. Each printer can print a certain amount of color dots per inch. The standard for high-quality prints is 300 dpi. However, there are many different printer models that work with many different dpi values. For instance, a poster will rather be printed with only 75 ppi, while high-end magazines may be printed with printers that produce up to 600 dpi. But the majority of printers use 300 ppi.
How does the ppi value affect the image quality?
The ppi value does NOT affect the image quality. Because the ppi value does not contain any size information. Ppi is just a relative value that needs dimensions in order to define the resolution of an image. So the ppi info is more like a tag that is applied to an image. It tells the printer how dense it should print the image.
However, it is still a good idea to save your images at 300 dpi when you want to print them. Not because it improves the quality, but because some print shops are receiving error messages from their machines (which usually process everything fully automatically) if the value is set to a lower number.
The real question is: "How many pixels does my artwork need so that I can have it printed at 300 dpi at a given size?”
So when you create your canvas, you should already think about the size you want the artwork to be printed in later. This will define your pixel resolution (width and height).
In order to find out the ideal settings for your canvas, you can simply use a converter that does the math for you. For example the one on https://pixelcalculator.com/. Just put in the desired printing size, set the dpi to 300 (or less, if you want a large-scale print that can only be seen from a few meters away), and it will show you the pixel values (width/height) your canvas needs.
Here's an example: If you want to print your artwork on A4 (which measures 210 x 297 mm) at 300 dpi, your canvas needs a resolution of at least 2480 x 3508 Pixels.

If you are using Photoshop
...you might have noticed that there is a toggle under “image > image size” called “Resample”. This is confusing to a lot of beginners, because when this toggle is enabled and you increase the ppi value (called “Resolution”), Photoshop also increases the actual pixel values. But this does NOT make your image better! It will just upscale your image by guessing how the “missing” pixels should look like, which always results in a blurry image. So better don’t use this function unless you have no other choice.
Instead, you can use Photoshop to check the size of your image. For instance, if the image is set to 72 or 150 ppi, you can type in “300” (without the “resample” option!) and you will see how big it can be printed in great quality.
Whenever you change the ppi value (without interpolation), the absolute resolution of the image will not change. There are still as many pixels as there were before. So if you want your image to have a higher resolution, you need to initially produce an image with more pixels, not increase the ppi afterwards. :)

Example
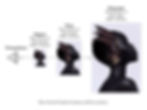
Here’s an example with my artwork“Libra”: I saved it with 1 dpi, another version with 72 dpi and another one with 300 dpi and opened them in Firefox. The result: All versions have the exact same size because their pixel dimensions are still identical. So the dpi value doesn’t matter for displays at all.

What can I do if my artwork is too small to print in the desired size?
Well, if you've already chosen a canvas size that’s too small for printing, and your artwork is completed, you can try to “fix” it by upscaling it with an AI-based software that does it way better and different than Photoshop. For this, I can warmly recommend Topaz Gigapixel (a paid software). It can increase the resolution of an image without making it blurry. A free alternative can be found on https://upscalepics.com/.
Please note that this should always be the last resort. It's best to always make your document size large enough so you don't have to upscale afterwards. This guarantees you the best quality in any case.
I hope this little guide was helpful in any way! If you are looking for some drawing tutorials, feel free to check out my workbooks on Gumroad.